Dear readers, you are in for a treat! We are going to create How To series for each of the major barcode equipment and software types. Our aim is to make it even easier for you to pick our barcoding brains. Starting with barcode printers, we are going to break out the basics into several posts including the FAQs our tech support gets.
You can’t print without labels loaded in your printer, so we’ll start with that. Barcode printers come in basically two flavors: desktop and industrial (also called tabletop).
Desktop Barcode Printers
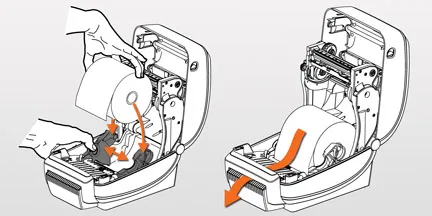
Most desktop barcode printers nowadays have drop in media loading, which makes it much easier.
- Open the top of the printer.
- Remove and discard any tags or labels from the roll that are dirty or that are held by adhesives or tape.
- Drop the roll of labels between two big guides so that the free end of labels is coming off the top of the roll.
- Slide the free end of labels through two smaller guides near the front of the printer.
- Close the top of the printer.
Voila! Your labels are now loaded. If you are using fanfolded media, you would feed the labels though the slot in the back of the printer and then follow steps 4 & 5 above.

Most desktop barcode printers nowadays have drop in media loading, which makes it much easier. If you are using fanfolded media, you would feed the labels though the slot in the back of the printer.
Industrial Barcode Printers
Industrial barcode printers are a little more complicated.
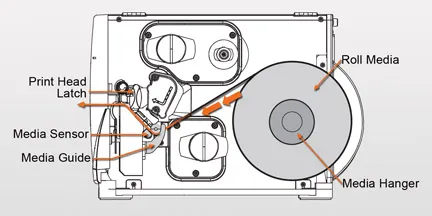
Industrial printers can use labels either on a roll or fanfolded. Roll media hangs on the media supply hanger. Fanfold media is stored in the bottom of the printer or behind it and can drape across the media supply hanger.
Roll Media
- Raise the media door.
- Remove and discard any tags or labels that are dirty or that are held by adhesives or tape.
- If your printer has a media supply guide on the media hanger, pull it out as far as it goes and for certain models, flip it down.
- Place the roll of media on the media supply hanger so that the free end of labels is coming off the top of the roll. Push the roll as far back as it will go.
- If there is a media supply guide, flip it up or slide it in until it touches the edge of the roll.
- Open the printhead. There is typically a lever or latch that you raise to do this.
- Slide the free end of labels under the printing mechanism and through the media guide.
- If done correctly, the labels will go under the print head, across the top of the platen roller, and out of the front of the printer.
- Close the printhead by lowering the lever or latch until it locks in place.
- Close the media door.

In industrial barcode printers, roll media hangs on the media supply hanger. Then the labels will go under the printing mechanism, through the media guide, under the print head, across the top of the platen roller, and out of the front of the printer.
Fanfold Media
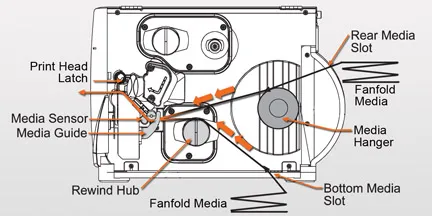
For many industrial printers, you can store fanfold media either behind the printer (rear feed) or under the printer (bottom feed).
- Raise the media door.
- Thread the fanfold media through the rear access slot or the bottom access slot.
- You can drape the media across the media hanger if you like, but it is not necessary. It could make the media’s path through the printer a little easier.
- Just like for roll media, open the printhead. There is typically a lever or latch that you raise to do this.
- Slide the free end of labels under the printing mechanism and through the media guide.
- If done correctly, the labels will go under the print head, across the top of the platen roller, and out of the front of the printer.
- Close the printhead by lowering the lever or latch until it locks in place.
- Close the media door.

For many industrial printers, you can store fanfold media either behind the printer (rear feed) or under the printer (bottom feed).
Media Sensors
Your barcode printer has upper and lower media sensors so it can detect the gap or notch between each label and tag. The lower media sensor sends out an infrared beam. The upper sensor can see that beam through the liner between the labels. For tags that don’t have adhesive or a liner, a notch or hole can be used for the sensors to see each other. In that case, the sensors must be lined up with the notch or hole.
If your tags have black marks on the back, the marks have to pass between the media sensors. Be sure to set the printer’s sensor type to black mark. This can be done either on the printer’s display menu or in the printer’s settings on your computer.
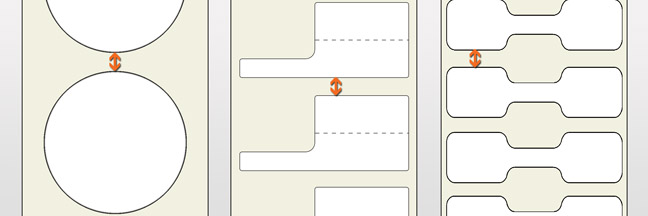
If your labels are not rectangles, lining up the sensors can be tricky. You’ll need to line up the sensors with the spot where the labels are the closest together. You have to be very precise about this or your printer won’t know where the next label starts.

For non-rectangular labels, line up the sensors with the spot where the labels are the closest together. You have to be very precise about this or your printer won’t know where the next label starts.


